|
|
|
If you search the internet, you will find many variations of this in-tank modification to eliminate the defective fuel supply
design in the
Ford 7.3 Powerstroke Super Duties. This page is simply another variation of how I did the modification with parts rounded up
from auto parts and hardware stores as a DIY project. Note: The cost of gathering all the parts for this project
was about the same as the kit that we
sell on our webstore. I like the challenge of putting a project together from scratch, but you
may want to save some time and purchase a pre-assembled kit
The o-ring connections found on the supply line between the tank and fuel pump would
do a very good job if they were under a constant positive pressure but they allow air to enter the system
whenever they have negative pressure applied.
With the fuel pump mounted on the frame rail, this line is subjected to vacuum as soon as the pump is switched on.
Most
PSD owners refer to this modification as the "Hutch Mod", named after the original design from one of the internet truck forum
contributors with the username of 'Hutchinaugusta'. Hutch spent a great deal of his own time investigating and documenting the
problems with the Ford fuel line. To Hutch, I am grateful because it sure helped reduce the 'cackle' that I had on my PSD.
|
Parts that I used to perform this modification1 - 3/8" tube compression union
1 - 5/16" tube compression
union
3ft - 5/16" stainless steel tubing
4" - 3/8" stainless steel tubing
10ft - 3/8" 30R9 rated fuel injection line
4 - stainless steel worm clamps
It is also highly recommended to use a pre-pump filter since the screening is removed with the mixing chamber. If you purchase
a pre-pump filter, you will need to have the proper hose connectors and clamps for the filter.
I was able to acquire a Racor
2 micron marine filter for this installation.
Got a question? Contact me on my DieselOrings.com webshop CONTACT PAGE
|
|
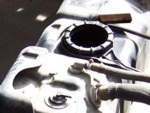
It is advisable to get the tank as low as possible to eliminate as much weight in the tank before removing the mounting
bolts as possible. I used my 10 ft of new 3/8" hose connected to the fuel bowl drain line located on the passenger's side of the engine and
ran it out to a 5 gallon fuel tank. I started the engine, open-end the drain valve and when I felt the tank was getting close to
empty, shut the valve off along with the engine.
Do not empty the tank in this manner while in an enclosed
shop or garage. Diesel vapors can be very flammable under the right circumstances!
|
[Click on a thumbnail to see a larger image - -
javascript must be enabled and popups allowed from this site]
|
Replace it with a new Motorcraft Pickup Foot
from DieselOrings.com!
|
 |
Begin the tank removal by disconnecting the fuel fill line and vent line from the fuel door. You will have to force these lines
over the frame as you lower the tank so I stuffed some clean shop rags into the open ends to keep any dirt that may be trapped
on the frame from falling into the tank as it was lowered.
|
|
 |
There are 4 bolts holding the tank to the frame. Support the tank at both ends, not in the middle where the fuel pickup is
located and unbolt the strap anchors. Remove the straps and lower the front end of the tank enough to reach the fuel lines
at the pickup cover. Disconnect the front tank vent tube. This vent tube goes through the bed frame support and connects to
the rear vent connection. The rear connection will be disconnected later. With the vent tube moved out of the way, you will have
enough room to unplug the electrical sender connector. Use a fuel line disconnect tool to open the vibrolock connectors on both
the 3/8 and 5/16 lines on the tank. Lower the rear of the tank enough to disconnect the rear vent line.
|
|
 |
Once all of the fuel lines and fuel sender electrical connector are disconnected, lower the tank to the ground. As the tank
is lowered, help feed the fuel fill hose and vent hose over the frame as it will try to hang up there.
|
|
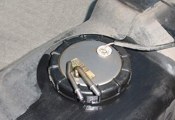 |
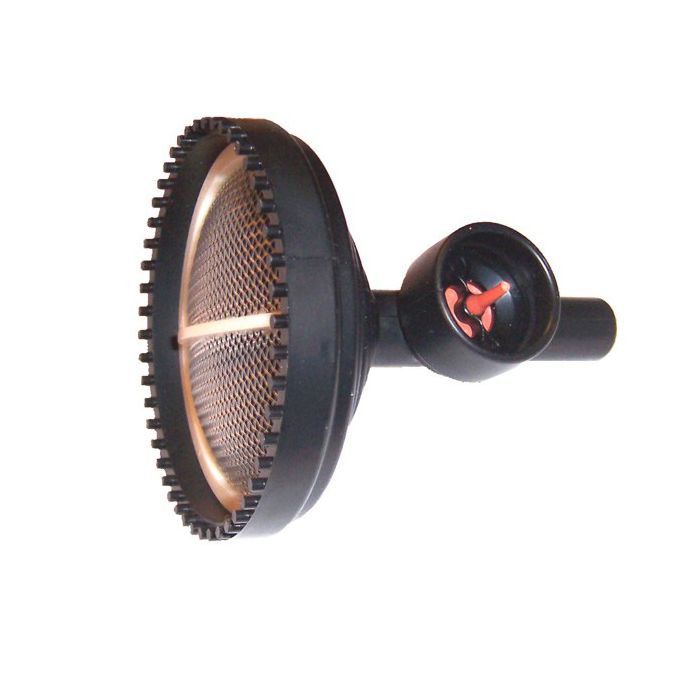
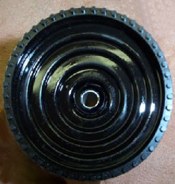
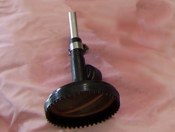
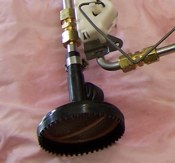
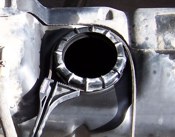
Once the top of the tank is accessible, the round cap can be unscrewed to remove the tank pickup. Take note of how the
tubes coming from the cap are oriented to the tank, the tank pickup will need to be re-installed in the same position. It may be
helpful to mark the assembly with a marker and the tank to realign later. With a block of wood and hammer, strike the ridges
in a counter-clockwise rotation to help break the top ring loose. Once it's loose, a strap wrench will assist in removing the
ring completely. Pull the fuel pickup out of the tank, being careful with the float assembly as it is fragile and can be easily broken.
|
|
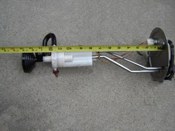 |
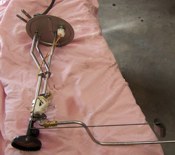
Once the fuel pickup is removed, measure the distance from the bottom of the pickup foot to the bottom of the top plate.
Write it down because this measurement will be used later when reassembling the unit after modification.
|
|
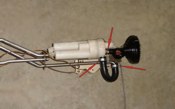 |
The mixing chamber has three clamps, two will have to be removed to disassemble the pickup unit. The clamp on the mixing
chamber itself does not need to be removed.
|
|
 |
On a workbench, loosen the screw clamp that holds the pickup foot to the tubing at the bottom of the mixing chamber
and pull the foot off.
Many that have done this modification have found that the pickup foot has cracked or may even be laying on the
bottom of the tank and is no longer usable. If you have this problem you can get a new Motorcraft pickup foot from
DieselOrings.com by clicking THIS LINK.
|
|
 |
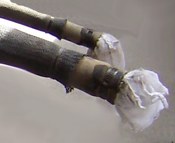
You will need to use a small screwdriver to open the crimped clamp that is connected to the stainless steel return tube. Pull
the flex hose from the stainless steel tube and slip the mixing chamber off the fuel pickup line.
|
|
 |
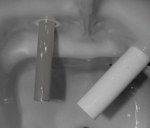
Remove the screen from the bottom of the fuel pickup foot. Use a 3/8" sharp drill bit and ream out the center of the foot.
Do not use an electric drill as the foot is soft and will easily open up a small amount using a drill bit and pliers. Slip the 4" piece
of 3/8" stainless steel tubing into the foot and run it to the bottom of the opening.
|
|
 |
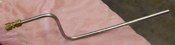
Tighten the clamp on the new 3/8" stainless steel tube and replace the circular screen in the bottom.
This is what the modified pickup foot should look like.
|
|
 |
Take the 3/8" compression fitting and tighten it on the fuel pickup line where the mixing chamber was located. Slip the end
of the 3/8" tubing on the pickup foot and measure the length from the bottom of the foot to the top plate. Compare this measurement
to the length you wrote down to determine if you need to trim off some of the tubing or lengthen it by loosening the foot clamp and
sliding some out of the foot. Adjust as necessary to get the same overall length and tighten the compression fitting on the pickup
foot.
|
|
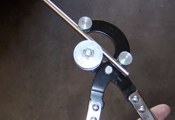 |
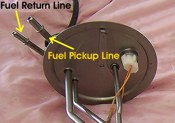
A piece of 5/16" stainless steel tubing will have to be bent for a new return line in the tank. This tube will direct the fuel that
is returning from the tank that may contain air bubbles away from the fuel pickup. Any air returned to the tank should make its way
to the surface without being picked up by the fuel pickup foot. I used an inexpensive tubing bender to form this return tube.
|
|
 |
The tube needs to be bent in a square 'Z' form to clear the movement of the float assembly.
|
|
 |
Measure how far the return will have to be to clear the float and make the appropriate bends. The tube needs to extend past
the float as to not cause turbulence to cause a false reading when the tank is near empty. Trim as necessary.
|
|
 |
Using the 5/16" compression fitting, fasten the new return tube to the 5/16" return tube on the pickup assembly.
|
|
 |
If you do as I used to and spend 15 minutes trying to get that last 3 or 4 gallons in the tank, this would be a good time to
do the 'Harpoon Mod' to your tank. This modification is simple and involves cutting the internal tank vent tube and fill tube as short
as you can. By doing this, I was able to get all but 1 gallon in the tank when the fill hose would first click off. I don't even waste my
time on that last gallon anymore.
|
|
 |
Reinstall the modified fuel pickup assembly in the tank, being careful when inserting the float and new return line into the tank.
Make sure your marks are aligned on orientation of the fuel lines to the tank. If you rotate the assembly, you will notice that
there is a small notch that the steel top disc will engage and will let you know that it is now in the proper position. It is very easy
to cross-thread the ring so be carefull and make sure it is aligned properly.
Tighten the top ring on the assembly using a strap wrench. I also used a block of wood and hammer, using the ridges on the
ring to beat against to achieve a very tight seal.
|
|
 |
Before sliding the tank under the truck, connect the new 3/8" fuel hose to the pickup line on the tank. Use two new worm
clamps, rotated 180º from each other to get a good seal. The original hose and vibrolock connector will be reconnected to the return
fitting when the tank is raised. Reinstall the tank in reverse order that you removed it. When raising the tank to its final position, make
sure that you do not crimp the new fuel line between the frame and the tank. Before tightening the strap bolts, make sure this line
moves freely and is not crimped.
|
|
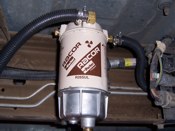 |
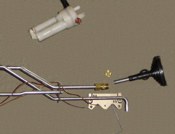
If you were curious and opened up the mixing chamber that was removed from the pickup assembly, you would have seen
the fine mesh strainer screens that are in it. Without these filtering screens in the fuel line, it is highly recommended to install
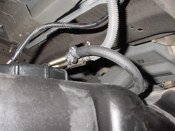
a pre-pump filter to prevent any contaminants from entering the fuel pump. Here I installed a Racor, 2 micron pre-pump filter and
mounted it on the frame between the tank and the transfer case. I also covered all the new fuel lines with a plastic wire loom
covering to protect it from any chaffing or rocks being thrown from the road.
NOTE - After installing my Helper/Lift pump modification and
running it for two months, I found that the Racor filter could not hold up to
the 7 PSI that the Carter pump added to the Racor Filter and it began to weep fuel from the primer pump. I ended up changing
the Racor out for a Dahl 2 micron filter without any signs of leakage since.
|
|
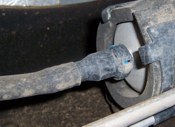 |
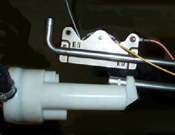
The vibrolock connection can be removed by releasing the connector by pressing on the blue lock tab. Due to road dirt and contamination
I was having a hard time getting the connector to release so I simply cut it off with a box cutter blade.
|
|
 |
The new fuel line from the pre-pump filter was connected to the inlet of the fuel pump. If you purchase an in-line filter for this
application, make sure that it is rated for 'suction'. Filters that are manufactured for this type of diesel applications are labeled as
"for suction only".
|
|
You will need to add fuel to the tank if you emptied it for removal and prime the pre-pump filter. Turn the ignition key on but do
not try to crank the engine yet. Listen for the fuel pump to stop running and turn the key off. Cycle the pump 4 or 5 times. Check
your fuel lines for any leakage at this time. If none, try starting the engine. It should fire off as it normally does.. just a lot more
quiet without all of the cackle! Check the fuel lines again for leakage and the job is finished.
|
Back to guzzle's Powerstroke Modification Index |


)
)
)
)
)
)
)
)
)
)
)
)
)
)
)
)
)
)
)
)
)