|
|
|
According to the Scheduled Maintenance Guide that came
with my 2002 F350 under the 'Additional services for: Light Trucks,
Sport Utilities, and Vans' every 60,000 miles:
"Lubricate 4x4 front hub needle bearings (F Super Duty)"
As reported by many other Ford Super Duty owners and verified by myself
from a local Ford dealership, many service departments will tell
you that "the SD 4x4 front hubs have no serviceable bearings". This is party true as the
main wheel bearings are sealed and the race is machined into the hub itself but there is
one VERY important bearing that IS servicable - the 'needle' or 'spindle' bearing.
I
was curious to find out what the costs were in servicing the bearings so I went as far as to ask to
talk to the Service Manager at the dealership. He told me the same thing that the service writer had said
and added the he thought the owners manual actually had a mis-print. After regaining control of my body twitching, all
I could say to him was "You guys scare the hell out of me!"
This maintenance procedure will outline the steps involved in servicing these needle bearings or sometimes referred to
as the spindle bearings.
Got a question? Contact me on my DieselOrings.com webshop CONTACT PAGE
|
Vacuum leak? ESOF hubs won't engage?
|
|
Powerstroke and Super Duty owners that are having problems with their ESOF hubs not working or have noticed that their air
conditioning or heating system will only blow through the defrost vents may want to perform this service to check out the
three points of potiential leakage in the ESOF hubs. The hubs are not the only source of leaks as the vacuum hoses
to the hubs, vacuum pump or the PVH solinoid (Pulse Vacuum Hub Solinoid) could also be potientially defective.
If the hub vacuum seals are leaking, they do pose the greatest threat of causing additional damage to hub and axle
areas.
|
Here is a quote about vacuum seal leaks in the ESOF SuperDuty hubs from Grampy_Jim - The Diesel Stop
on the subject of vacuum leaks:
|
Grampy_Jim:
"The 'lock' signal to the hubs is weak... about 12 inches Hg. The unlock signal is very weak.... about 6 inches.
It doesn't take much of a leak to create problems. Unless there is some kind of concern with the PVH solenoid,
the hubs cannot 'self-engage'.
Many owners labour under the notion that the yellow O-ring is the only seal to worry about.....
This seal, unless damaged in installation, is rare to fail... Once it is installed, it doesn't move.
The dark coloured O-ring on the locking hub assembly never seems to give concerns, even after
removing and reinstalling the hub multiple times.
The usual culprit is the large knuckle seal (the expensive one). What will fool the yellow O-ring
crowd is that disturbing the large knuckle seal can allow it to perform well in a recheck of the system -
but that wont last long. A worn out seal is a worn out seal....
(EDIT: knuckle seal - Ford part number F81Z-3254-CB; diff housing dust seal - Ford part number F81Z-1S175-HCA
Available at DieselOrings.com)
The insidious part of a leaking knuckle seal.... If it allows air to enter the knuckle cavity, it can
also allow moisture and dirt to enter the knuckle cavity. This contamination can damage the spindle bearing and
destroy the stub axle.
I have seen them so bad that mud has plugged off the vacuum lines.
Those that service their ESOF hubs regularly never have any nasty surprises..... those that drive
from one breakdown to the next, hate the system."
--------------------
Ford Master Tech - Diesel Certified.
|
|
[Click on a thumbnail to see a larger image - -
javascript must be enabled and popups allowed from this
site]
|
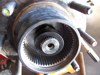
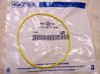 |
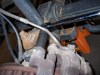
Parts that I used to perform the service
Anytime that the sealed bearing hubs are pulled from the
knuckle joint, you will need to replace the yellow vacuum o-rings
on the back side of the hub. The failure of these seals to create a
tight vacuum within the hub is the most common reason for failure
of the autolock hubs to engage 4x4 from the dash control. Vacuum
leaks at this seal can also cause malfunctions of the heating
system vents. You will need 2 of these o-rings. Ford part #
F81Z-4A322-AA
|
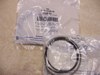 |
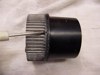
The autolock hub also has an o-ring on the flange where it
seats into the sealed bearing hub cavity. This o-ring also provides
part of the vacuum seal necessary for proper operation of the
autolock hubs. The good news is that Ford enclosed two o-rings but
only 1 clip in this package. The explanation on the packaging
contents states: "Retaining clip for hub lock retention to wheel
hub; O-Ring for testing hub lock; O-Ring for final installation of
hub lock into wheel end" Ford part # 4C3Z-1K106-AA
DieselOrings.com has a kit, Made in the USA, that contains 2 stainless steel clips
and 2 o-rings that will service both hubs for much less than the
Ford part with only one clip.
You can get these at DieselOrings.com.
|
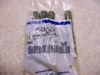 |
If your undercarriage is showing excessive corrosion, you may
need to replace the studs that fasten the sealed hub unit to the
knuckle frame. Ford's list on these studs is less than $3 per stud.
I was lucky and was able to clean the small amount of corrosion
from my stud bolts and re-use them. Ford part # F81Z-1107-AA (pack
of 4 studs)
|
|
 |
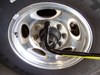
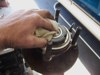
Remove the hubcap
First of all SET THE PARKING BRAKE. It
would also be a good idea to chock the rear wheels to keep the
vehicle from moving while jacking it up and positioning the jack
stands. Using the tire iron that came with the truck, the end is
covered with a soft plastic jacket is designed to pry off the
hubcap without damaging the wheel surface.
|
|
 |
Remove the tire
Before jacking the truck off the ground, break the lugs loose
about 1/4 turn. Jack the wheel off the ground and place a jack
stand under the axle. Never work on the axle with
the tire removed when only supported by a jack. Lower the
jack down so the axle sits firmly on the jack stand. Finish
removing the lug nuts and remove the rim and tire.
|
|
 |
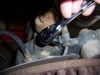
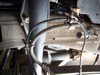
Disassembly
Begin by unclipping the ABS sensor wires from the two plastic
clips attached to the brake line. Disconnect the vacuum line from
the fitting on the chassis, it just pulls off. Pull the vacuum line
through the clips and leave it connected to the hub.
|
 |
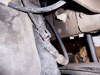
Remove the small bolt holding the ABS clip to the hub assembly
using an 8mm socket.
|
 |
Disconnect the ABS electrical connector located on the rear
side of the front fender well. Carefully run the wire back to the
hub assembly and let it hang from the hub.
|
 |
Carefully pry the brake pads open to give clearance to remove
the caliper from the brake rotor.
|
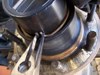
 |
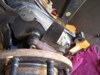
Using a strong breaker bar wrench and a 13/16 sockets, remove
the 2 bolts holding the caliper to the knuckle joint and pull the
caliper up and off the rotor.
|
 |
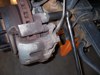
Set the caliper on the leaf spring and using mechanics wire,
secure it so it will not fall off. It is a heavy unit and if it
were to drop, damage could occur to the brake line and your
toes!
|
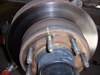 |
Mark the orientation of the rotor to the hub, you will want to
put the brake rotor back on over the same studs that you removed
the rotor from. Once marked, remove the rotor and set it off to the
side.
|
 |
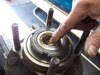
With a pair of needle nose pliers, remove the retaining clip
from the autolock hub.
|
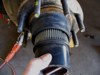 |
Grasp the autolock hub and pull straight out and remove the
autolock hub assembly. Set it on a clean work area as this unit
will have the o-ring replaced later.
|
 |
Looking into the hub from where the autolock hub was removed,
you will be able to see the ring clip that secures the axle to the
hub assembly. Using a pair of c-clip pliers, remove the clip by
expanding it over the axle shaft and remove it from the
housing.
|
 |
Remove the three thrust washers, paying close attention on the
order that they were removed. There are two round washers with a
hex washer in between them. They will have to be re-installed in
the same order. Place the thrust washers off to the side and keep
them clean.
If you have a broken or worn washer, the Ford part for
a package that contains all 3 is F81Z3B458AA
|
 |
With a 13/16" socket and heavy breaker bar, remove the 4 lock
nuts holding the hub to the knuckle joint.
|
 |
Now comes the tough part, separating the hub assembly from the
knuckle. Spray the studs from the back of the knuckle and around
the entire circumference when the hub and knuckle meet with PB
Blaster. Let it soak in for a 10 minutes or so. Take a thin blade
putty knife and lightly tap it between the joint, working around
all 4 corners, keep at it. After a while, it should begin to
separate. If there is excessive corrosion on the studs, it may be
necessary to use a punch and force the studs out from the back of
the knuckle. If you are forced to separate the hub in this fashion,
make sure that you have purchased new replacement studs incase you
damage them during this process.
|
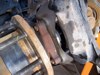 |
With a lot of wiggling up and down, side to side, the hub will
begin to pull free from the knuckle joint. A little cussing usually
helps at this point.
|
 |
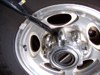
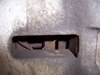
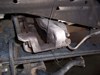
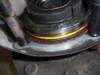
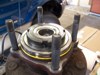
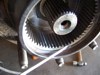
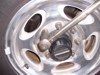
With the hub off, we expose what this entire exercise has been
about, the needle bearings, yep those
non-serviceable, non-existent bearings that the dealerships
apparently have no knowledge of. Hopefully you can see on this
photo that there is a small amount of lubrication remaining on
these bearings but they do need servicing.
If your needle bearing
looks worn, you should replace it with a new bearing
(Ford-C6TZ-3123A NAPA-B2110)
|
 |
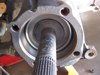
The bearing race on the hub axle will be damaged if the needle
bearing were to run dry and would require replacement of the outer
shaft.
99% of the Ford dealers will tell you that only the complete axle
shaft and u-joint is available and will run about $500 per side.
There is actually a Ford replacement outer shaft (4C3Z-3B387-AA}
and it will run around $120 plus the cost of new needle bearing,
inner and outer grease and dust seals for about $250 per side.
Behind the race sits a thrust
washer and the large
knuckle seal that would need to be replaced if your ESOF hubs have a vacuum leak as this is
the most common point of failure that will cause the hubs to not hold vacuum. Failure of this seal
will also allow the vacuum pump to draw in moisture and dirt, wihich will accelerate needle bearing failure.
|
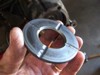 |
Tucked against the knuckle seal is a thrust washer. If you pull it out you will see four grooves that have been cast in this washer.
The reason for the grooves is to allow vacuum for the ESOF hubs to pass by this point and activate or deactivate the hubs. Lubricate this
washer with a light coating of grease. Too much grease will keep your hubs from working correctly. Also note that the grooves must
be positioned towards the knuckle seal upon reassembly.
If you need to replace this thrust washer, the Ford part number is F81Z4228BA
and is also available at DieselOrings.com
|
|
 |
Cleanup
Remove the dust shield. This will allow access to replace the
yellow vacuum o-ring, clean the studs and most importantly - lube
the needle bearing.
|
 |
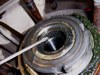
Place the hub in a soft jaw vise and cover both the hub's
sealed bearing and exposed needle bearing. With a strip of emery
cloth, 'shoeshine' the corrosion from the studs. If you have
damaged one or more of the studs, or if the studs are highly
corroded, replace the studs. Studs can be removed by threading on
two nuts on one of the studs. Tighten the nuts together and remove
by using a wench on the lower nut, backing it out of the hub.
|
 |
Wipe as much of the old grease from the needle bearing and
clean it out. I felt that brake cleaner in this close of proximity
to the main hub bearing would not be wise so I sprayed the bearing
clean with WD-40. With a clean rag, wipe the remaining residue from
the bearing and from the axle tube.
|
 |
Spray the bearing clean with WD-40 or a spray parts cleaner.
Hold a rag under the hub's axle tube to catch the cleaner draining
from the bottom of the hub. Do not allow cleaner to overspray and
contact the hub's main sealed bearing that is visible from the top,
just below the needle bearing. With a clean rag, wipe the remaining
residue from the bearing and from the axle tube.
|
 |
Using your finger, press a high quality bearing grease into the
bearing. Force it throughout the entire bearing, working it into
all crevices while turning the bearing in its seat.
|
 |
Remove the old yellow vacuum o-ring. Clean out the o-ring
groove with a clean rag. Put a thin coat of grease on the new
o-ring and place it into the o-ring groove. Coat the studs with a
thin coat of anti-seize compound. This will slow down the corrosive
action on the studs and will make the next removal a little
easier.
|
 |
Use a small piece of emery cloth and clean the face of the
knuckle joint. Wipe the face and interior of the knuckle joint
cavity clean and coat the face of the knuckle joint mating surface
with a thin coat of anti-seize compound.
|
|
 |
Hub Installation
Place the dust shield over the hub assembly and insert it in
the knuckle hub cavity. Start the lock nuts on the studs from the
back of the knuckle and lightly tighten with a 13/16" socket.
Slowly work your way around all 4 studs, drawing the hub into its
seat evenly. Once the hub is fully seated, torque the nuts to 133
lbs-ft
|
 |
Reinstall the three thrust bearings over the axle. Install in
the same order that they were removed, round, hex, round.
|
 |
With c-clip pliers, slide the ring clip over the axle. Make
sure the clip is set and secure in its seat.
|
 |
Remove the old o-ring on the autolock hub assembly and clean
any dirt from the o-ring groove. Coat the new o-ring with a white
grease and install on the autolock hub. If your AutoLock hubs have
not been recently serviced, you may want to consider doing it at
this time. Here is the link to the procedure
to clean and lube your AutoLock hubs.
|
 |
Coat the o-ring seating area in the hub with the same white
grease you used to prepare the o-ring.
|
 |
Place the autolock hub into the axle housing and when it seems
to stop, use the palm of your had to give it a final knock to seat
the o-ring in the hub. Install the retaining clip on the autolock
hub.
|
|
Place the brake rotor on the hub, aligning the marks that were
previously made so the rotor is returned to the same position on
the hub as when it was removed.
|
 |
Replace the caliper over the brake rotor and secure with the 2
caliper bolts. Torque to 166 lbs-ft.
|
 |
Replace the ABS line into the brake line clips. Run the ABS
line to the rear of the fender and reconnect the plug into its
socket.
|
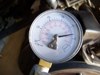 |
NOTE: The MityVac Vacuum/Pressure Kit is an
invaluable tool in diagnostic testing on the 7.3 autolock system and can be used for brake flushing, Master brake reservouir evacuation, HPOP oil extraction along with many other automotive
applications.
Connect a MityVac hand vacuum pump to the hub's vacuum line. Pump the line up to 5-10 in Hg. As the hub is slowly evacuated of air, the
gauge may slowly drop below 5 in Hg. If so, pump the line again and
watch the gauge. After a few tries, the gauge should hold vacuum
without dropping. If the gauge indicates a leak, you will have to
find and repair the defect. I was able to watch the gauge for 5
minutes without any loss of vacuum at 7 in Hg. Run the vacuum line hose
through the brake line clips and reattach it to the vacuum line at
the frame rail.
|
 |
Install the rim and tire on the hub and torque to 150-165
lb-ft. Reinstall the hub cap. Start the engine and pump the brake
pedal to fill the caliper pistons. Put the truck in gear and test
the brakes. Release the brake and slowly begin moving while tapping
the brakes to re-position the brake pads in the calipers. When the
brakes feel normal, take a test drive as listen for any unusual
sounds coming from the front wheels. All should be OK and the
needle bearings are good for another 60,000 miles!
|
|
|
Back to guzzle's Powerstroke Maintenance Index |


)
)
)
)
)
)
)
)
)
)
)
)
)
)
)
)
)
)
)
)
)
)
)
)
)
)
)
)
)
)
)
)
)
)
)
)
)
)
)
 [1,307KB ]