|
|
|
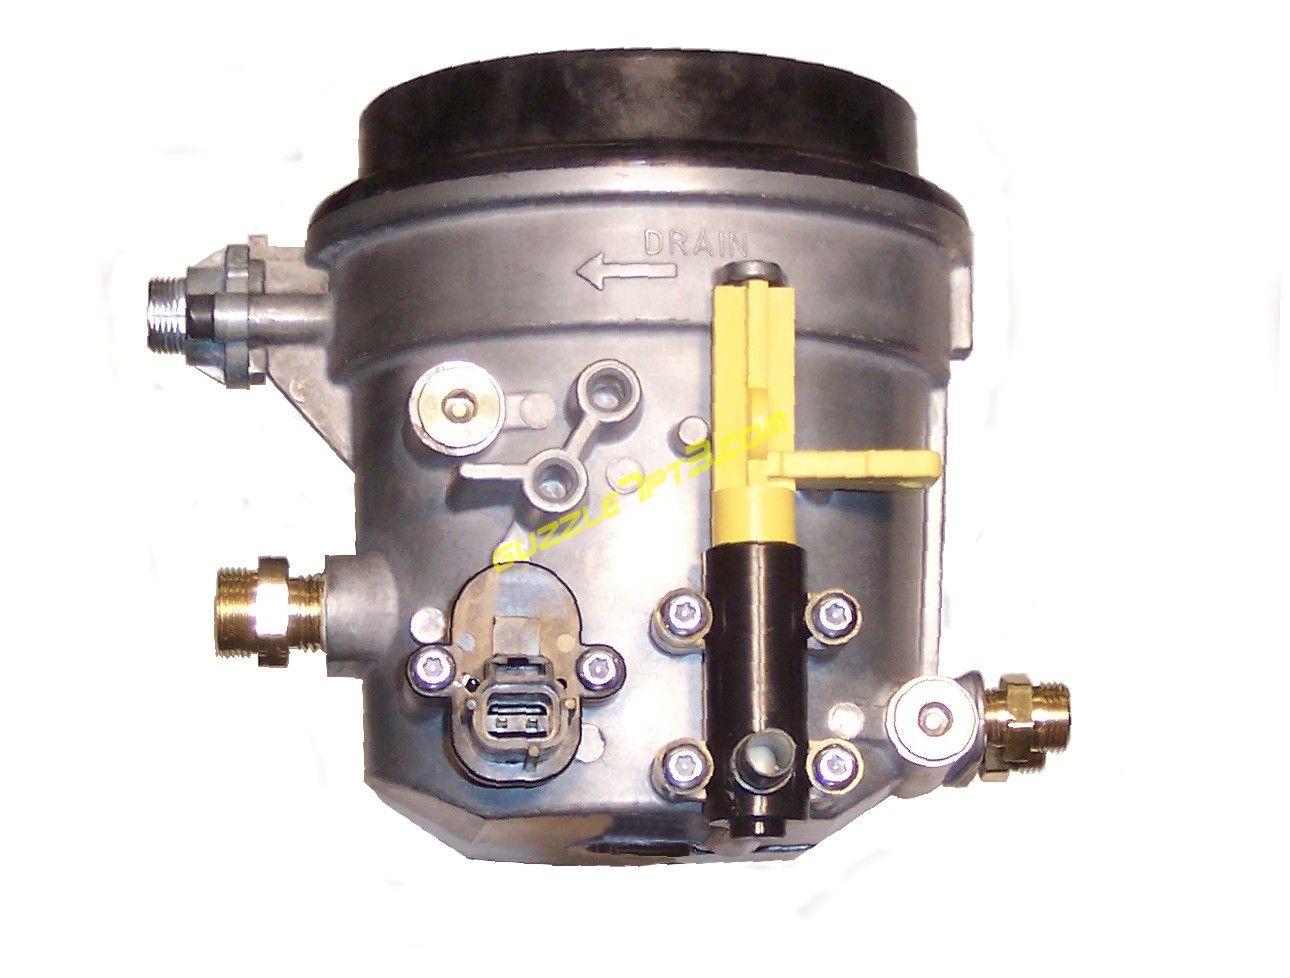
Fuel filter canisters, commonly know as the fuel bowls are of the same design on the 1999 through 2003 Ford 7.3 liter Powerstroke diesels.
If you have found fuel dripping under your truck and coating the front axle or have fuel puddles in the engine valley there is no need to go to the Ford dealer and
spend $250 for them to fix your leak. Although the fuel manufacturers have not claimed responsibility, the number of reported fuel leaks on the 7.3's can not reasonably
be accounted to coincidence since the introduction of ULSD. What I have found is that some of the chemical additives in ULSD are separating the PTFE coatings that Ford
uses on their fuel and oil seals from the o-rings themselves.
When the coatings separates two things occur:
- The PTFE coating does not separate evenly, leaving gaps that fuel can travel past the sealing surface causing the "leak" to appear, usually on top of the engine..
- Most all of the factory o-rings are made of Buna-N which has a greater percentage of swell and the least amount of resistance to fuel permeation than other elastomers offered in the industry,
namely Viton®. Fuel permeation and swell causes the elastomer to become soft and unable to seal the fuel pressures found in the 7.3 fuel injection system.
The fuel bowl can be rebuilt while left in the engine bay but I have found that a more thorough job of cleaning can be performed if it is removed and serviced on the work bench.
|
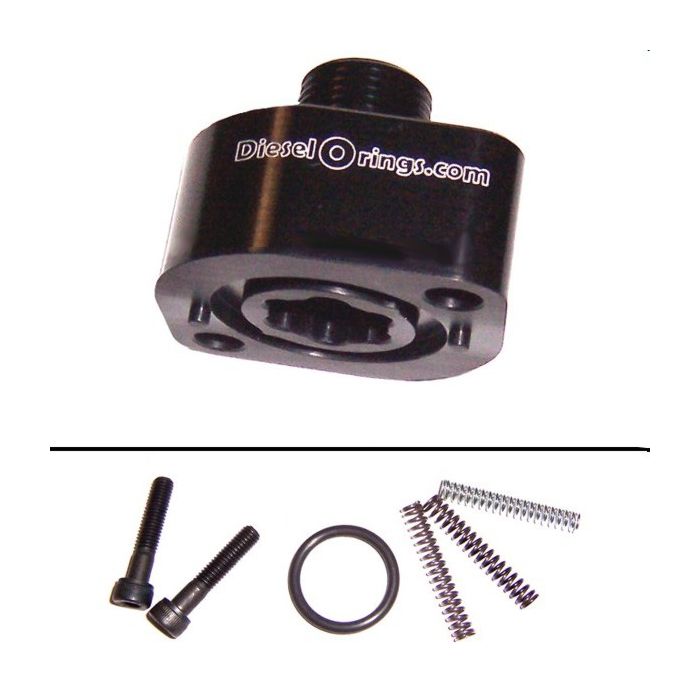
DieselOrings.com's billet aluminum replacement FPR housing
Broken factory housing? Or just want to gain
performance by increasing your fuel pressure over stock? The kit includes this billet aluminum housing, 3 preset pressure springs, o-ring and bolts.
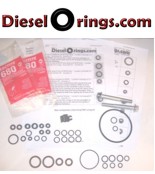
DieselOrings.com's Full Mechanics Parts Cabinet combo kit
The kit contains 34 o-rings, 6 fuel hard line gaskets,
new Turbo bolts and much more! Everything you need to rebuild the fuel bowl along with the o-rings and seals for most common leaks found on the HPOP and engine.
|
|
Questions? Contact me on my DieselOrings.com webshop CONTACT PAGE
|
|
Parts and supplies to rebuild the fuel bowl canister
-
-Complete fuel bowl o-ring and fuel line sleeve kit - 11 o-rings and 4 Parker Vibra-Lok® sleeves (guzzle's DieselOrings.com)
-
-T-20 torx bit driver
-
-T-25 torx bit driver
-
-Parts cleaner solvent and tray (or plenty of Brake Clean)
-
-2 ft of 3/8 hose to attach over the drain tube under the engine.
-
-Drain pan/container to catch the fuel when emptying the fuel bowl
-
-Lacquer thinner to remove PTFE residue from canister and fittings
-
-Shop rags
|
[Click on a thumbnail to see a detailed image (800 x 600 pix) - -
javascript must be enabled and popups allowed from this site]
|
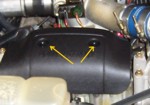 |
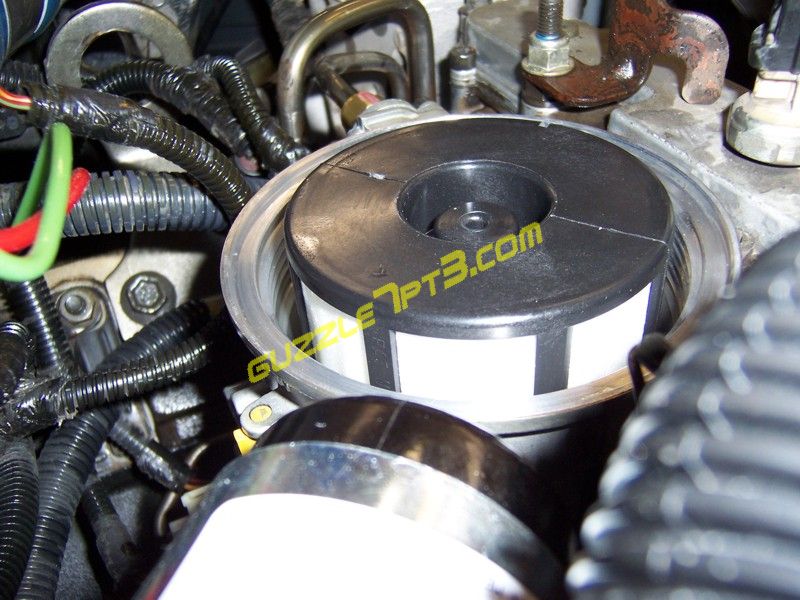
First, remove the plastic engine cover by unscrewing the two cap nuts. This will expose the fuel filter bowl that sits directly
in the center of the engine valley.
|
 |
Locate the fuel drain tube that leads from the rear of the fuel bowl on the top of the engine and
terminates under the passenger's side cylinder head, on the front of the engine. It is a 3/8" stainless steel tube tucked
close to the engine, directly over the front axle. Slip the 3/8" hose over the drain tube and route it to a drain pan/container
on the floor, under the engine. This will catch the fuel that will be drained from the fuel bowl during this service and keep from making
a mess on your shop floor.
|
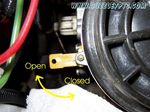 |
Rotate the yellow drain valve clockwise, 90 degrees and completely drain the filter bowl empty.
This is the valve that you going to
remove to replace the internal o-rings. Leakage seems to have increased considerably with ULSD Fuel (Ultra Low Sulfur Diesel).
|
 |
When the bowl has emptied, close the drain valve and remove the lid from the fuel bowl. Pull the fuel filter straight up and out of the bowl using a shop rag
to catch any fuel dripping from the filter. Replace the lid on the bowl.
|
 |
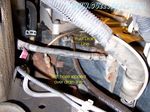
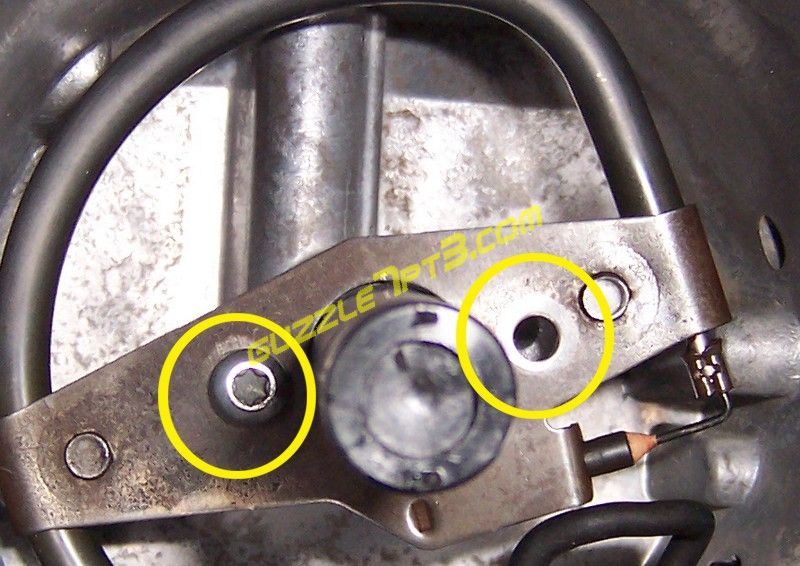
To remove the fuel bowl from the engine compartment, remove the two
1/4" fuel rail lines from the passenger's side of the fuel bowl; remove the 5/16" return line from the fuel bowl pressure relief valve (FPR) and the 3/8" fuel inlet line.
Pull the drain tube off of the drain valve that is attached with a short piece of hose. There is only one electrical connection on the fuel bowl and it is the bowl heater/water-in-fuel
sensor connector on the back side of the bowl. Release the locking clip and pull the connector toward the rear of the engine block. The fuel bowl is attached to the HPOP
reservoir with two bolts, remove these bolts and the bowl will come out of the compartment.
|
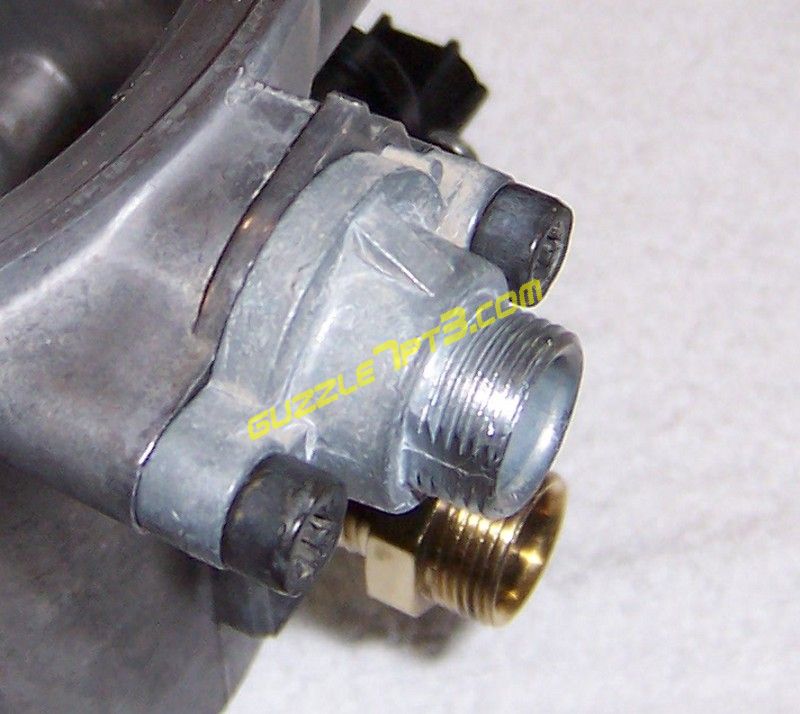 |
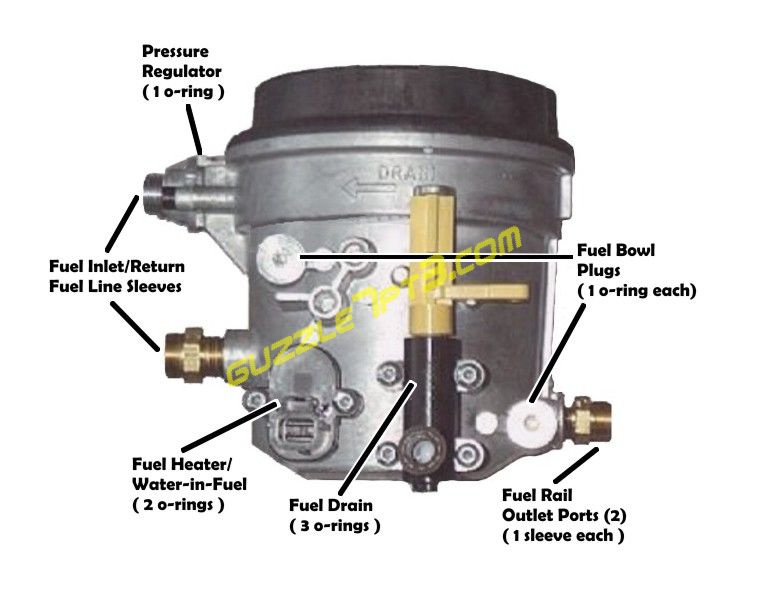
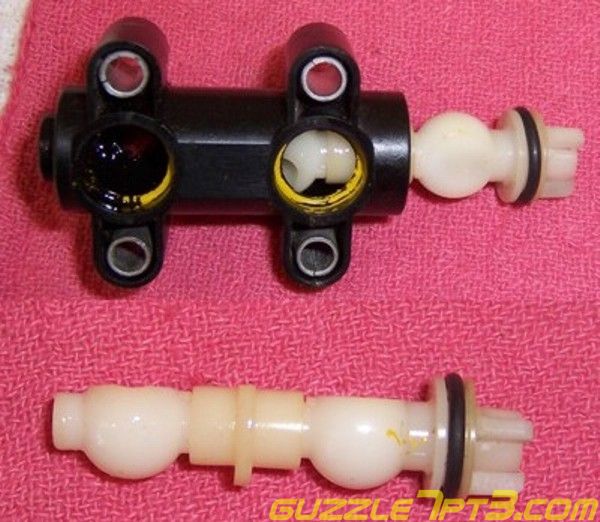
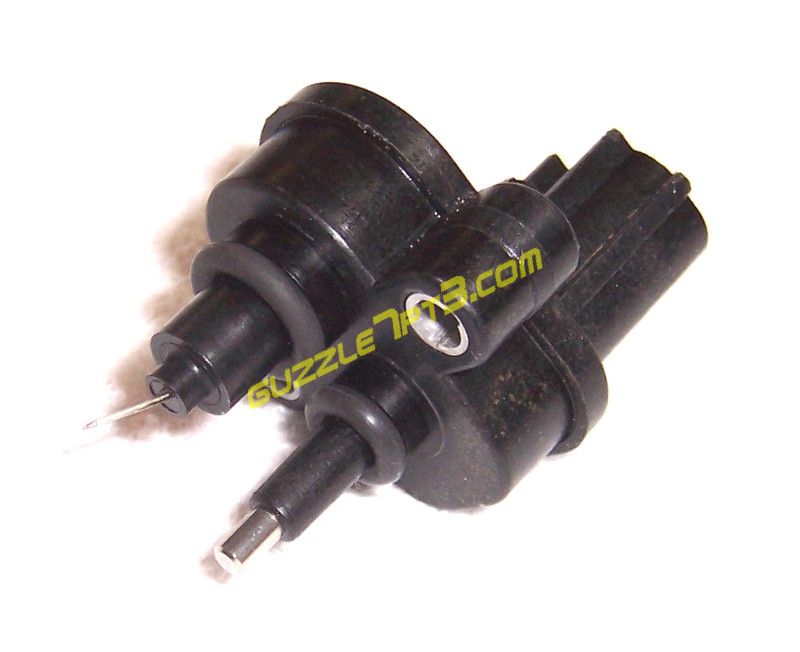
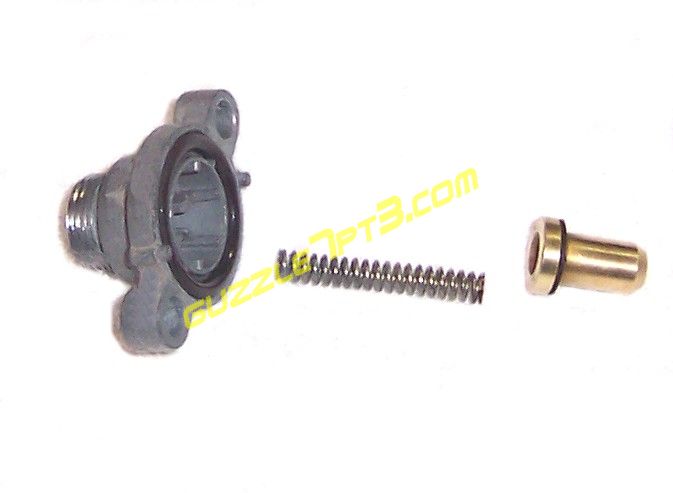
Remove the Fuel Pressure Relief Valve (FPR): Use a #25 torx bit and begin unscrewing the two bolts that hold the FPR housing to the canister. Unscrew
the bolts evenly on both sides just a few turns at a time to allow the housing to and not bind on one of the bolts due to the pressure of the spring forcing
the housing outward. Remove the housing, o-ring, spring and brass relief valve seat.
The compresson fitting threaded end of the FPR is a weak point on this fitting
and can easily snap off if too much pressure is applied when installing the fitting. If you break your housing, guzzle's DieselOrings.com
has a replacement FPR cap that can be purchased separately.
|
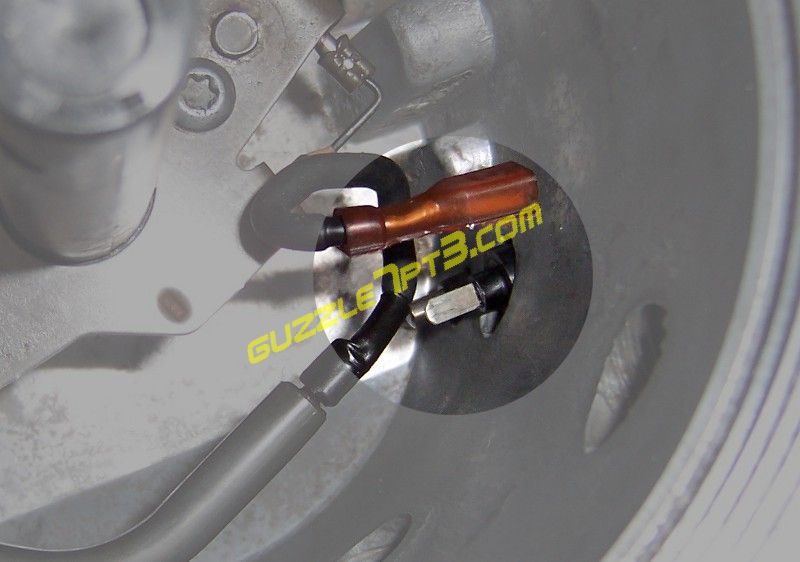 |
Disconnect the Fuel Bowl heater electrical connector inside the fuel bowl: Pull the heater spade connector from the electrical connector from inside the canister.
It may be easier to use a pair of needle nose pliers to reach this connector.
|
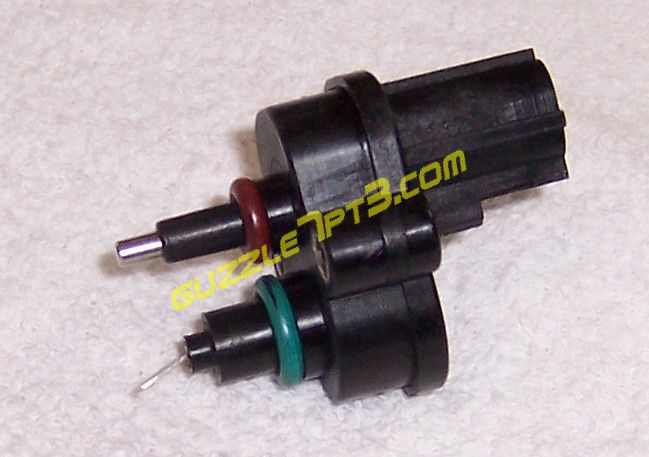 |
Remove the Fuel heater / Water in fuel Sensor: Use a #20 torx bit to remove the two screws securing the sensor to the canister.
Pull the sensor from the bowl and the two o-rings will stay attached to the sensor.
|
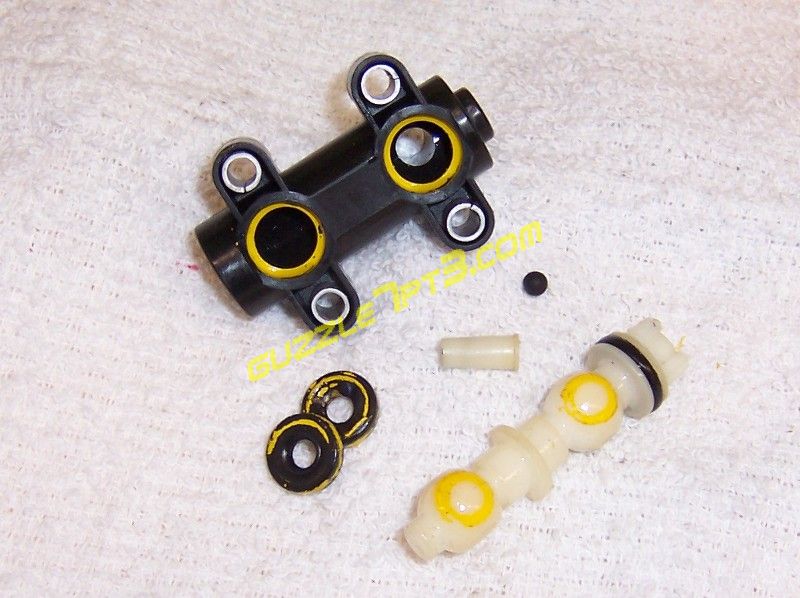 |
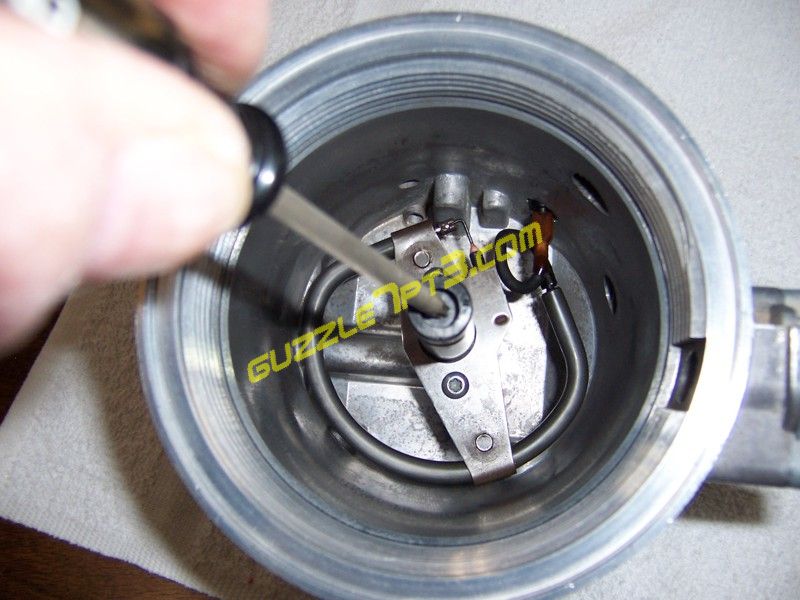
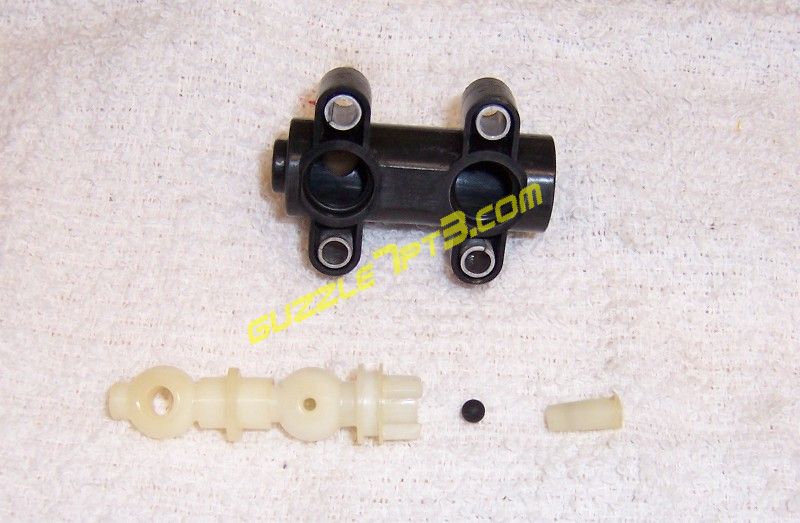
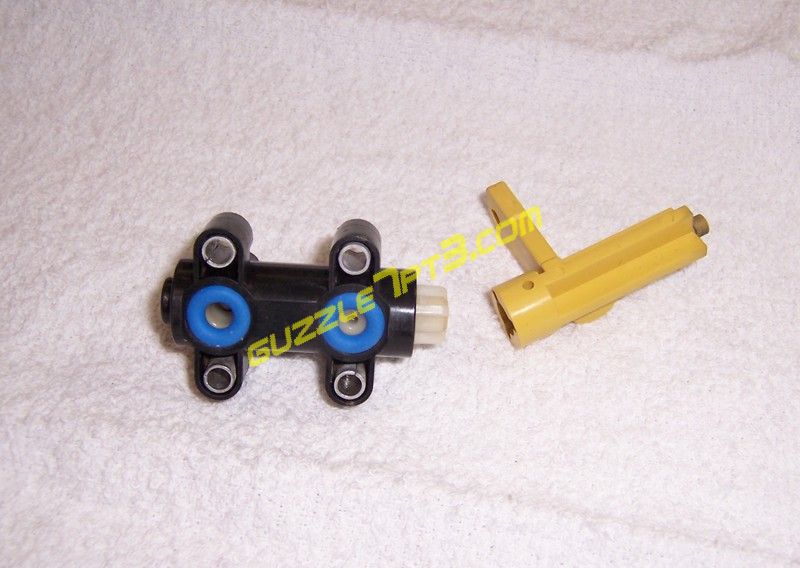
Remove the Fuel Drain Valve: Use a #20 torx bit to remove the four screws that hold the drain valve to the bowl. If you have the original o-rings installed in the valve,
you will notice that the PTFE coating that Ford has applied to the drain o-rings has separated from the o-rings and has adhered to the valve body, shaft balls and fuel bowl.
The PTFE coating that separates from the o-ring is usually why the fuel drain o-rings are the first to fail and cause a leak within the drain valve.
|
 |
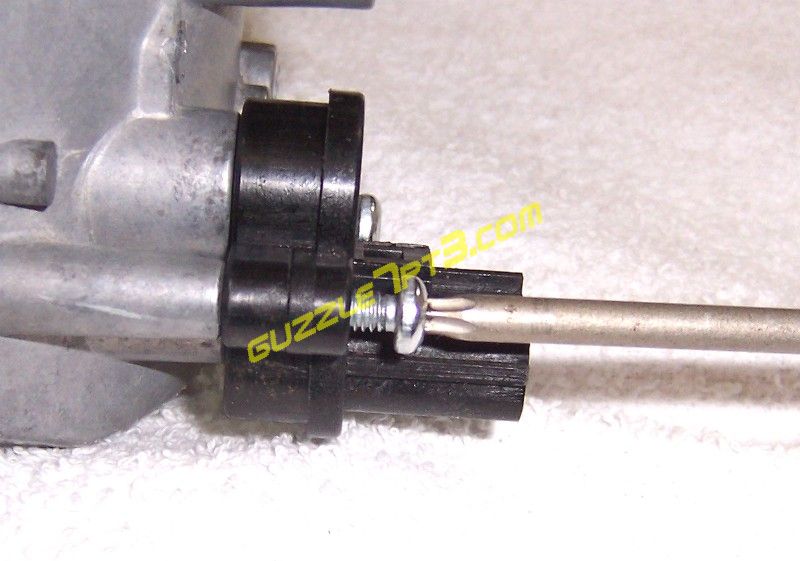
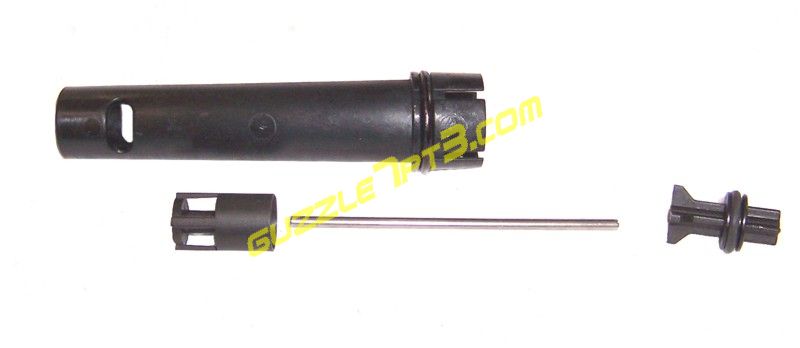
To disassemble the fuel drain shaft from the drain valve body first remove the small tube that is found at the very top of the valve stem. This can be removed by using a
pick tool or use an 8x32 machine screw, threaded lightly into the opening at the top and pulling it out.
|
 |
Below this small tapered tube is a plastic check ball. Be careful not to loose this ball during the cleaning process. Use a pick tool to remove the o-rings from the valve body.
Rotate the drain valve 180 degrees so you can see the flat side of the shaft's balls through the o-ring openings. When in proper alignment, the stem can be pulled from the body.
Remove the o-ring at the top of the valve stem. It will be necessary to clean the PTFE residue from the valve body, valve stem and the fuel bowl to keep the new o-rings from
being contaminated and leaking in the future.
Improper cleaning can keep the o-rings from properly contacting the canister body, drain valve stem and body.
|
 |
When the PTFE coating separates from the o-ring it will adhere to any metal or plastic parts that it is in contact with. If rebuilding the fuel bowl on the engine some of these areas are
difficult to see but it is very important to clean all surfaces in contact with the coated o-rings thoroughly.
The best way that I have found to clean up the residue is to use a clean rag with a small amount of lacquer thinner. This seems to be able to cut through the PTFE easily.
Wash out the valve body to remove any remaining PTFE chips or dirt that has infiltrated the fuel drain valve.
|
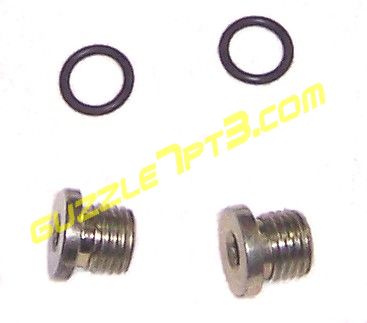 |
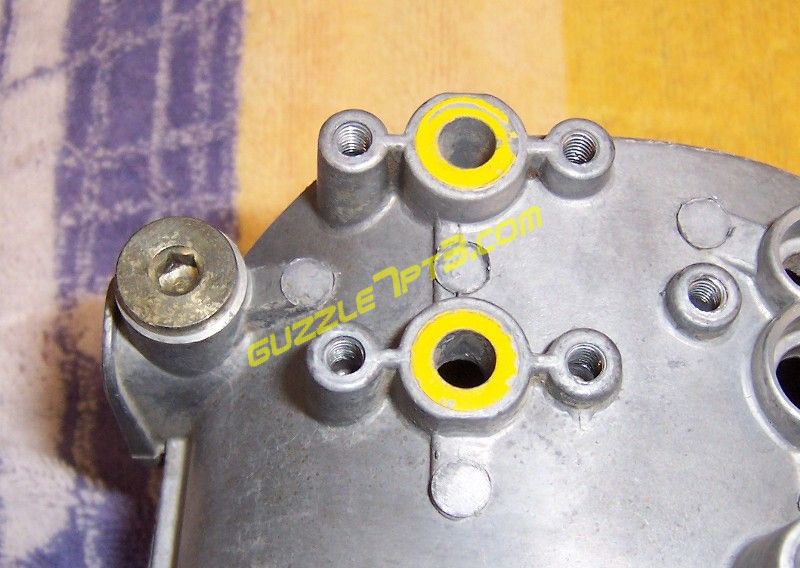
Remove the port plugs from the fuel bowl using a 3/16" hex Allen wrench. Remove and discard the old o-rings. |
 |
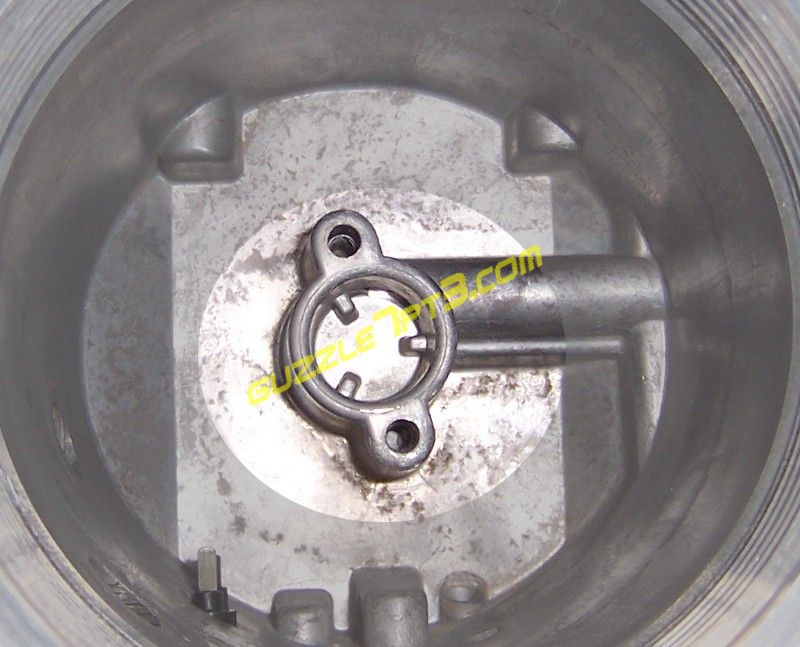
Removing the Fuel Bowl Heater and filter check valve assembly: Use a #20 torx bit to remove the two screws holding the heater element in place. Gently pull the heater and check
valve assembly (black stem piece in the middle of the heater element) out of the fuel bowl. Set the heater element off to the side and disassemble the check valve assembly.
|
 |
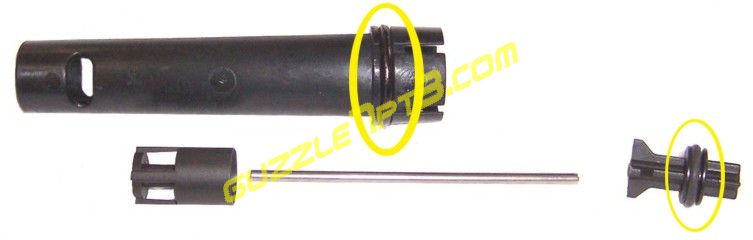
Fuel Filter Check Valve Assembly : The check valve is made up of 5 parts, the valve body, plunger, rod, valve seat and spring. Use a small diameter
rod, a pencil will work and push the plunger, rod and seat out of the valve body. There is one o-ring on the valve seat and another on the base of the valve body that inserts into the base of the fuel bowl.
With a pick tool, remove the old o-rings and dispose of them.
|
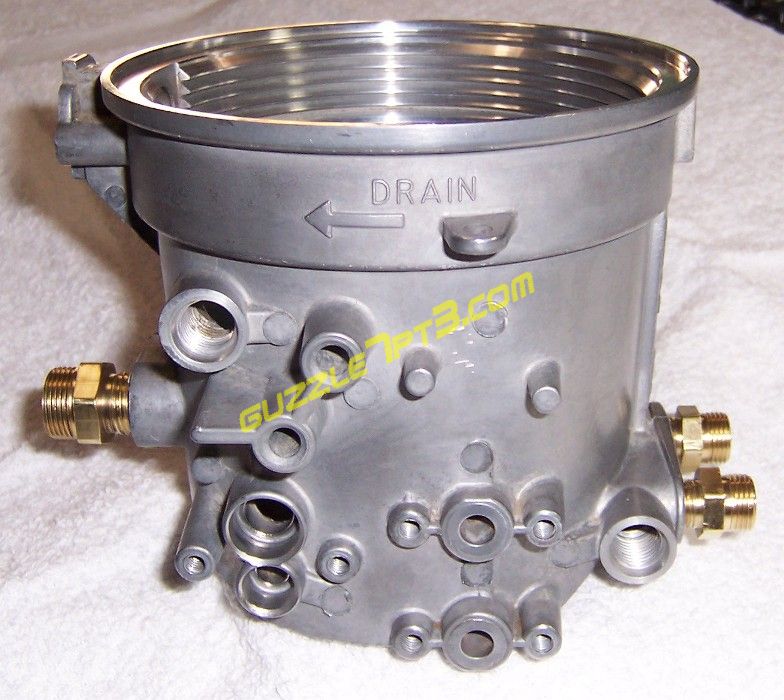 |
After thoroughly cleaning the interior and exterior of the fuel bowl, this is what you should have. Optionally, you can remove the fuel inlet and outlet fittings and clean them. The large 3/8" inlet fitting
threads are 3/8" NPT and the small outlet threads are 1/8" NPT. Use the appropriate taps and clean the remaining thread sealant from the bowl threads but DO NOT remove any of the bowl metal with the tap,
only the old thread sealant. Blow out all of the ports and openings with high pressure compressed air. Reseal the inlet and outlet threads with a liquid thread sealant that is rated for diesel fuel.
Tighten these fittings to 60 - 65 lb-in. Do not use Teflon tape as small pieces of tape can roll and get into the fittings plus Teflon tape can cause the fittings to crack the fragile fuel bowl. These very small shreds
of tape could travel through the fuel rails and get into the injectors and cause the injector not to work properly.
|
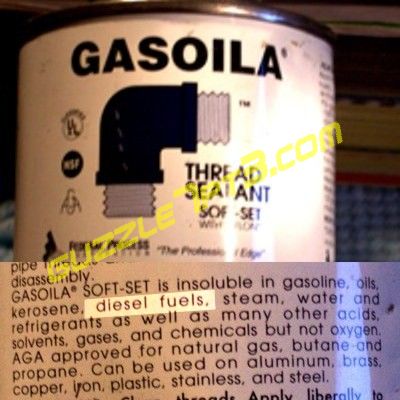 |
This is the thread sealant that I recommend for all of the fuel and oil fittings on the 7.3L Diesel. It is a Teflon based thread sealant rated for gasoline, oils, kerosene,
diesel fuels, steam, water and refrigerants and can be used on brass, aluminum, iron and steel. It is perfect for our automotive uses and is available in a 2oz tube at
DieselOrings.com.
|
[Click on a thumbnail to see a detailed image (800 x 600 pix) - -
javascript must be enabled and popups allowed from this site]
|
Reassembly: |
|
Filter Check Valve o-rings : Lubricate both o-rings with a small amount of diesel fuel and install on the valve body and check seat. Reassemble the check valve
in the same order that it was disassembled and install the spring onto the check valve seat.
|
 |
Insert the check valve assembly into the chamber in the bottom of the fuel bowl and place the fuel bowl heater element over the valve body. Fasten the heater element with two #20 torx screws to the fuel bowl base.
|
 |
Check the operation of the check valve by pushing down on the plunger through the hole at the top of the check valve body making sure that the valve moves freely.
|
 |
Lubricate the new o-rings with a small amount of diesel fuel. Place the o-rings on the sensor so they touch the back shoulder of the sensor. Insert the sensor into the fuel bowl and secure with the 2 #20 torx screws.
Reconnect the heater electrical spade clip to the spade tip on the sensor.
|
 |
IMPORTANT STEP!
Prior to installation of the FPR housing it is necessary to clean the cast threads of this part since any contamination can cause the compression fitting to bind and snap the threads
from the housing. Use a bench grinder with a wire wheel brush to smooth off any burrs or other foreign matter from the threads
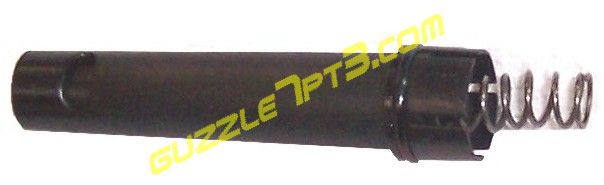
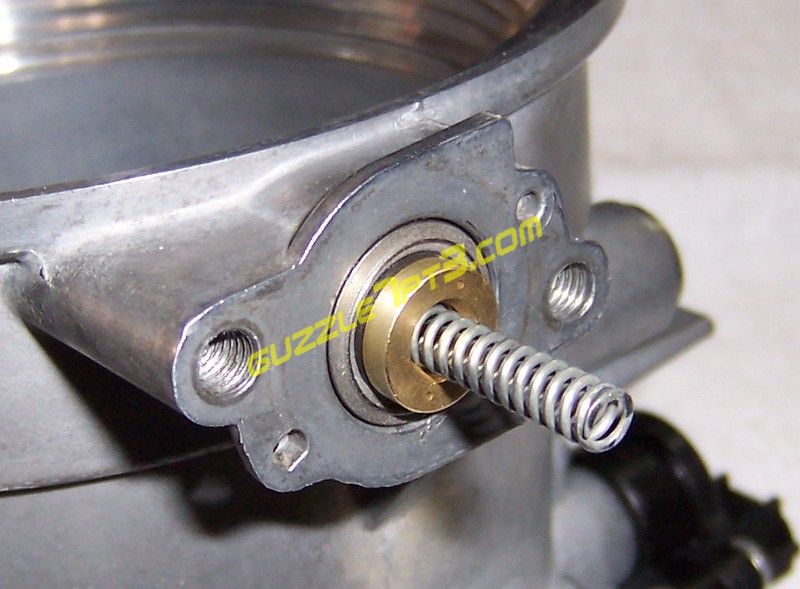
Fuel Pressure Relief Valve: Install the new FPR o-ring on the housing. Place the relief valve seat in the fuel bowl opening and insert the spring into the valve seat. Place the FPR housing over
the spring and with one hand, collapse the spring with the housing until the housing touches the fuel bowl and fasten the housing with the 2 #25 black torx screws.
|
 |
Fuel Drain Valve: Once all the PTFE residue and dirt has been cleaned from the valve, place a new o-ring on the top of the drain stem. Align all of the flat sides of the stem
shaft and insert the stem into the valve body. It will take a small amount of pressure to snap the new o-ring in place so the stem is fully seated in the valve body. Drop the plastic
ball into the top of the valve stem and secure with the small tapered tube. Lubricate the 2 drain valve o-rings with a small amount of diesel fuel and press them into the valve body openings.
Place the yellow stem handle on the drain valve and rotate so the handle is pointing away from the 2 drain valve o-rings. Secure the drain valve to the fuel bowl with 4 #20 torx screws making
sure that the valve is secured tightly to the fuel bowl to prevent the possibility of it leaking. Make sure that the valve shaft is centered in both o-rings. You can see this
when the valve is in the open position when looking at the holes through the o-rings.
|
|
|
Install the new o-rings on the fuel bowl plugs, lubricate with a small amount of diesel fuel and reinstall in the fuel ports. Tighten using a 3/16" Allen wrench.
|
[Click on a thumbnail to see a detailed image (800 x 600 pix) - -
javascript must be enabled and popups allowed from this site]
|
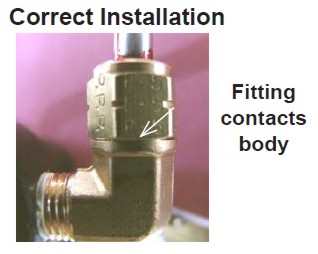
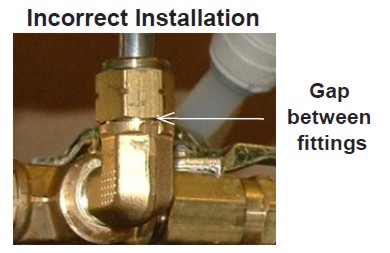
Reinstall Fuel Bowl:Place the fuel bowl back on the engine and secure in place to the HPOP reservoir. Use new Viton fuel line sleeves on the fuel inlet, fuel rail lines and the pressure relief valve.
Tighten the brass compression nuts until the nut touches the brass fitting. There should not be any gap between the compression nut and the brass fitting for proper fitment. (See below for proper installation)
Reconnect the electrical connector for the fuel bowl heater/water-in-fuel sensor.
Install a new fuel filter according to the filter manufacture's instructions.
Make sure the fuel drain valve is CLOSED. Cycle the fuel pump while watching the fuel bowl for leaks. After three cycles start the engine and check for leaks once again.
|
|
|
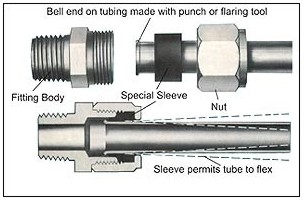
Installing the Vibra-Lok Fuel Line Sleeves
Fuel Inlet, Return and Cylinder Head Fuel Rail lines:
- 1. Remove the line from the fuel bowl fittings. You will find that the sleeves have become hard, dry and cracked.
- 2. To remove the old sleeves, use a small screwdriver and/or pick tool to dig the old sleeve from the compression nut.
- 3. Use a commercially available brake cleaner to flush out the remnants of the old sleeve from the nut.
- 4. Lubricate the new sleeve with light oil or diesel fuel and push it over the flared end of the fuel line.
- 5. Push the fuel line into the fitting until it stops. While making sure that the tubing stays fully inserted into the fitting, tighten the nut to the fittings.
- 6. The nut on a Vibra-Lok fitting must be tightened until it contacts the body of the fitting.
WARNING This does not apply to the compression nuts on the FPR valve. These are aluminum cast threads and the
compression fitting should only be tightened to the point where you can feel the sleeve being compressed. Too much pressure and
the threaded end will easily snap off of the housing.
|
|
|
|
Back to guzzle's Powerstroke Maintenance Index |


)
)
)
)
)
)
)
)
)
)
)
)
)
)
)
)
)
)
)
)
)
)
)
)
)
)
)
)
)
)
)
 [ 1.5MB ]